
By setting the proper dimensions, your WordPress featured image will look professional and complement your site’s overall design. Adhering to WordPress’s guidelines for such images leads to enhanced visual appeal, improved loading speeds, and a better user experience.
In this article, I’ll give you step-by-step, detailed explanations of how to create and set up the featured images for your article, as well as advice about some good practices to take into consideration.
Let’s begin.
Key Takeaways
- The optimal resolution for a WP featured image is typically 1200 x 628 pixels, which is effective for most themes and social media platforms.
- Featured images should be high-resolution to avoid blurriness when enlarged on various sites, ensuring they grab attention and communicate the article’s core message.
- Consistency in image style across your WordPress site helps maintain a cohesive brand image, with elements like fonts and logos aligning seamlessly.
- Featured images must be relevant to the article’s content to enhance reader engagement and accurately reflect the topic.
- Always ensure you have legal rights to use images by sourcing them from copyright-free sites or using stock images to avoid potential legal issues.
- Optimizing images for search engines involves using alternative (alt) text related to the article’s key concepts, improving visibility and accessibility.
What Is a WordPress Featured Image?
A WordPress featured image is the thumbnail of your article or blog post, similar to the thumbnail of a YouTube video, for example. It will become the default image associated with the article when it’s shared on other social media websites as well. Usually, the WordPress theme you use chooses the featured image for the article and it will more than likely be the first image displayed in said article. Regardless, you can always change the featured image manually.
There are three places where the featured image usually appears on your page, with those being near the top of your page, anywhere that has a link to the article/blog post with the featured image (e.g. a homepage or a search results page), and when you share a post online platforms or social media websites like Twitter, LinkedIn, Facebook etc. Sometimes the featured image may appear on your website in image galleries, background images, and the image sliders on your homepage.
The primary goal of the featured image is to grab the viewer’s attention and communicate the core concept and tone of your website and brand. Since your WordPress featured image is the very first thing the reader will associate your article with, it’s necessary to take into consideration the correct image sizing and resolution. It really needs to pop and attract the reader’s attention.
What Featured Image Size to Use On Your WordPress Website
In many situations, the WordPress theme you’ve chosen dictates the image size and where exactly it’s located on your website. The majority of WordPress themes have them enabled, or at least the ones that are worth their salt. Even then, the featured image may not appear where you want, depending on your chosen theme.
The most suitable resolution size for your featured image is around 1200 x 628 pixels. This resolution tends to work best across most WordPress themes or layouts. It also looks attractive when shared on social media platforms, especially when featuring a large image. There is the occasional WordPress theme where the default featured image size may deviate from 1200 x 628 pixels. You can change it manually, and I explain how to do so below.
Sometimes the 1200 x 628 pixel resolution size may not be what you want, and your preference may vary from the theme layout. You may want to adjust the dimensions of your image on social media platforms or change the aspect ratio. Ultimately, it’s up to you and your taste. I’m here to help you understand how you can tweak and adjust everything to your exact liking.
How to Set a Featured Image in WordPress
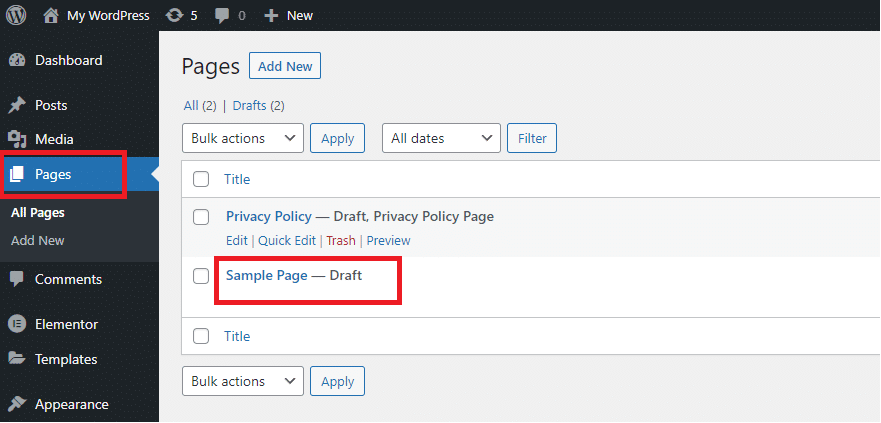
- Click on the Pages tab and then choose which page you want to open.
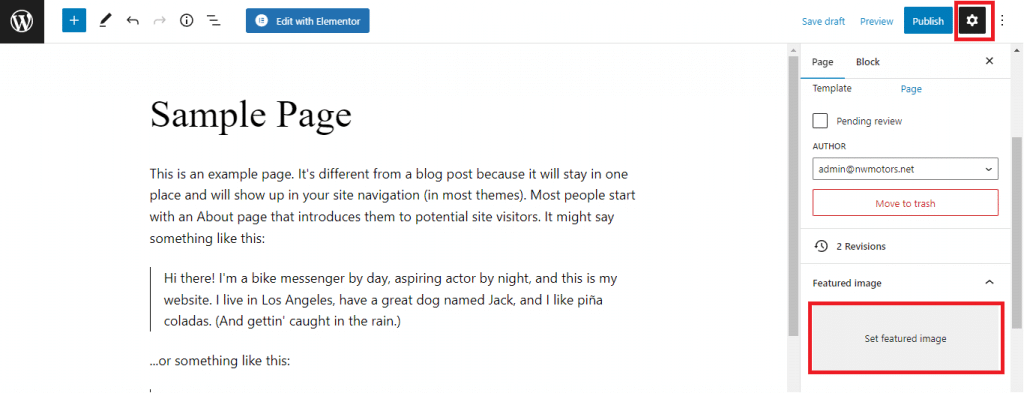
2. Once the page has opened, click on the gear icon in the top right and you will see the option to choose your featured image.
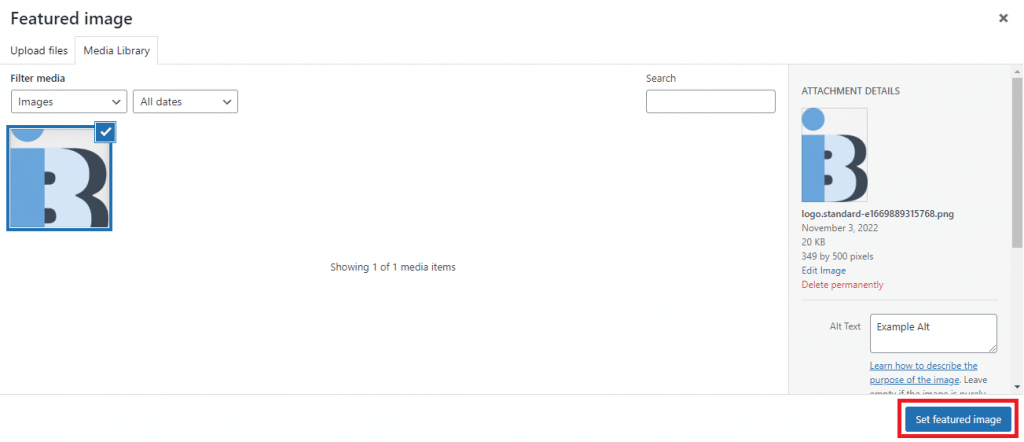
3. Select or upload the image you want and then click on the Set featured image button.
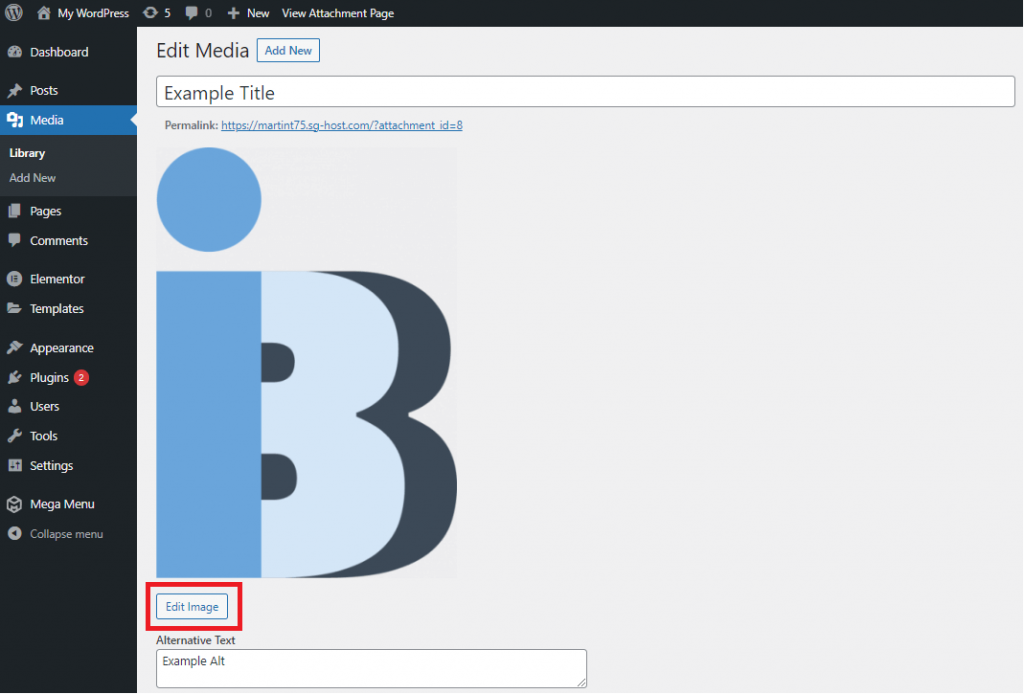
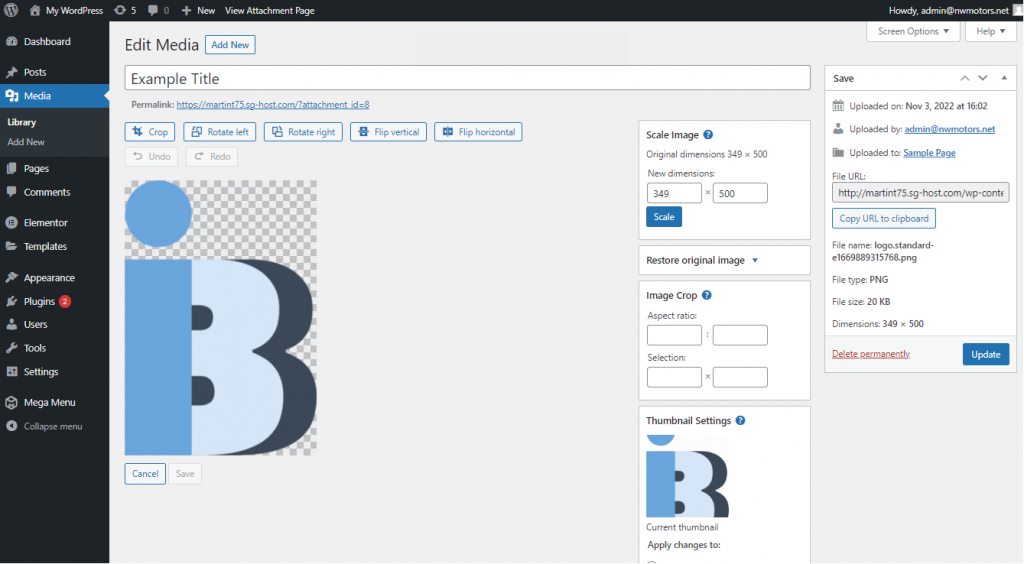
4. If you want to adjust the resolution or crop the image, click on the media tab and then click on Image.
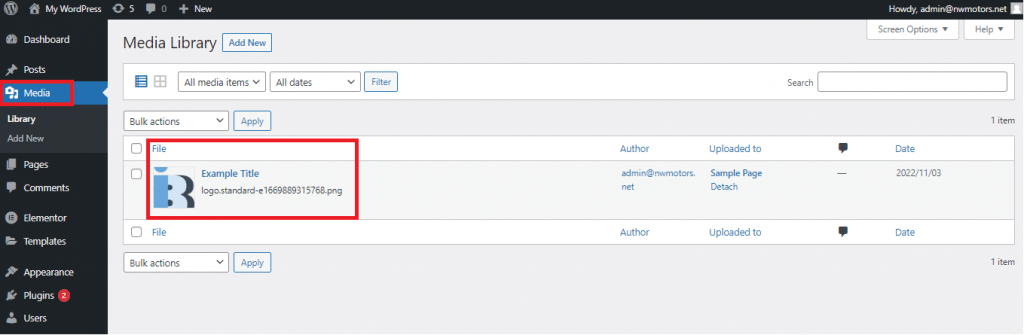
5. Click on the Edit Image button.
You can adjust the resolution, change the size, or crop the image in the tab on the right and then click Update when you’re ready.
Best Practices for WP Featured Images
Apart from choosing the appropriate size and resolution for your WordPress featured image, there are some other things to take into consideration. Below I’ll break down and explain the best strategies and practices, including everything from using high-resolution images to choosing simple and clean images for your WordPress site. All of these strategies are available so you can utilize your featured image to its maximum potential, including changing the featured image size to suit your layout.
Use high-resolution images
Your WordPress featured image is the first visual representation of your article that a reader sees, so choosing a high-resolution image is important. Your article will be shared on platforms where the featured image size can be displayed at a slightly larger size than in your WordPress article. Twitter, for example, has the thumbnail size increase when you click on an article, and so does Pinterest. Therefore you must use a high-resolution image to avoid blurry or pixelated thumbnails since high-resolution images can be scaled up without issues.
Choose simple and clean images
To clearly communicate the fundamental idea of your article to the reader, the thumbnail needs to grab attention by not being overly convoluted or difficult to understand. The image should be simple and clean, while still being interesting enough that it makes an impression on the reader.
Finding this balance between minimalism and uniqueness when selecting your images will help your article look more professional on your WordPress site. When you choose an image that is simple to comprehend and understand from a glance, the reader is more likely to be drawn to it, and subsequently, the article itself.
Keep your WordPress images consistent
There should be a consistent style present throughout the WordPress images in your posts or pages. Everything from the font you choose to the logo and the information you display in the posted images should all be consistent and flow seamlessly together. So if you’re adding any new or additional elements to the image, they need to feel in sync with what’s already presented on the page.
Otherwise, they might stick out like a sore thumb and give the article’s whole presentation a chaotic feeling. It may come across to the reader as if completely different people were responsible for choosing the individual visual elements for the piece. A sense of cohesion is vital.
Always use images relevant to the article
People are visual creatures by nature. We naturally process pictures and images much faster than text. So choosing an image that accurately illustrates the core content idea of the text is a must. You don’t want to click on a thumbnail showing a car, only for the article to be about deep-sea diving. Every single image used within the text needs to be relevant to what you’re writing about.
For example, food, wedding, fashion, or photography blogs need to have pertinent images to represent the product or idea that’s being communicated to the reader. However, not just any generic image related to the broad subject matter of the article will do. If you are writing a food blog about how to bake a chocolate cake, it’s best to use an image of the exact cake you’re baking instead of a generic picture of a cake or any other type of dessert.
Make sure you have legal rights to the image
A frequent issue that pops up in many articles is using copyrighted images by mistake. This is more common than you might think, even among more experienced authors. You need to be careful when uploading images online since they are all automatically covered by copyright protection.
If you need copyright-free stock photos, I recommend using websites like StockSnap.io and Pixabay. Carelessness in this area could lead to legal and financial issues for you. It can also create a bad impression on potential readers that might recognize any copyrighted images and negative word of mouth could spread about your blog or website.
Advice: Reformat Your Old Featured Images
If you want to reformat your old featured images, you’ll need a specific plugin. A good one to use is Regenerate Thumbnails by Alex Mills. Another option is to re-upload them manually with the new specifications you want. It’s also an excellent idea to manually crop your images to the WordPress thumbnail dimensions. Otherwise, you’ll experience issues with auto-cropping.
Another thing to keep in mind is that if you want to change the dimensions of when an image is uploaded, you need to adjust the settings first, and only then will the new default image settings be applied to every newly uploaded image on your website. To avoid blurry photos or warped images, it’s a good idea to size newly uploaded images to the featured image settings you’ve applied to your blog.
How to Optimize WordPress Featured Images for Search Engines
Here, I explain how to optimize your featured images so that they not only grab the reader’s attention but also show high up on search engines like Google and Yahoo as well. Alternative (alt) text is the main way to achieve this. Using relevant and important keywords that capture the central ideas of the article and utilizing alternative text correctly increase the chances of your content ranking in search results.
Additionally, it helps readers who might be visually impaired understand the picture. Written text descriptions can really help in this instance. Placing the relevant keywords in the featured image title also helps search engines index your pages. It’s a good idea for your non-decorative images on your website to have alternative text and descriptive titles.
Conclusion
Hopefully, now that you’ve read through some of the strategies and advice on how to handle and use WordPress featured images, you’ll have come to an understanding of why executing this aspect well makes your blogs look more professional.
They are essential for brand awareness and recognition through numerous distribution channels, e.g., social media. Regardless of the image you choose, it’s important to stick to the WordPress featured image dimensions, and make sure the images are clean, simple to understand, and thematically consistent with the article you’re writing.
Find out more about the best image usage practices in my comprehensive article.