Figuring out how to write an outline for a blog post can sometimes feel like a waste of time for content producers. If you have a great idea in mind for a blog post, you’ll want to dive in and start writing as soon as possible—before that spark of inspiration fades.
Unfortunately, diving into a post without the right plan of action can lead to a host of problems. Without a clear, structured blog outline to guide you, it’s easy for your post to veer off track. You might end up with an article that sounds more like a stream of consciousness than a valuable resource.
Creating an outline for your blog post helps to eliminate this problem. It gives you a step-by-step plan for all of the information you need to cover to create a post with impact.
Today, we’re going to show you how to write a good outline quickly that will significantly improve your writing strategy without consuming too much time.
What Is a Blog Post Outline?
Before we dive into our step-by-step guide on how to write an outline for a blog post, it’s worth defining what a “blog post outline” actually is. Contrary to popular belief, it’s not just a series of bullet points or a brain-dump of information sourced from all over the internet.
A blog post outline is essentially a complete guide to everything you need to know about your article before you write it. This document outlines:
- The topic: What you’re going to be talking about, including any sub-topics, key points you want to cover, and specific questions you need to answer.
- The angle: What your perspective is going to be on the topic, and what kind of tone you’re going to use throughout your blog.
- The structure: What points are you going to make in which order? How are you going to support your angle with anecdotes, facts and statistics?
Why Should You Create a Blog Post Outline Before Writing?
Creating an outline for your blog post ensures you create a structured, valuable piece of content. It stops your arguments from veering off-track randomly as you conduct research and flesh out your piece. In some cases, it can also help you create content that’s properly optimized and has the right blog post length to appeal to your target audience.
Ultimately, a well-structured outline will prevent your content from being hard-to-follow and confusing. You’ll clarify what you want to say and what you want your blog to accomplish before you start writing, so you can avoid wasting time on countless edits and drafts.
Benefits of a Blog Post Outline:
Learning how to create an outline for a blog post offers several benefits. It can give you more structure to your writing process and significantly improve the value of your content. Some of the core benefits of writing a blog post outline include:
- Beat “blank page” syndrome: For writers, there’s nothing worse than staring at a blank page or Google doc. Looking at a blank page for too long can cause you to overthink your content and procrastinate, rather than jump into writing. An outline prevents this.
- Improve writing quality: Because you outline all of the points you want to cover and the goals you want to achieve with your content in advance, you’re more likely to produce great content. Your writing will have a better sense of flow and focus, delivering genuine value to your target audience, so they want to continue to read your future posts.
- Reduce editing time: Outlines get you, your editor, and any client you’re writing for on the same page. This reduces the risk of you creating the wrong kind of content, which then needs to be edited and recreated before it can be published.
How to Write an Outline: Step by Step
Now that we’ve covered why you need an outline, let’s start looking at how to write a blog post template. Notably, there’s no one-size-fits-all process here. The more time you spend blogging and creating content, the more likely you are to discover an outlining process that works for you.
However, in the meantime, the following steps should help your blogging strategy:
Step 1: Choose your topic and target keyword

First, you’ll need to brainstorm what you’ll be writing about. Many bloggers make the mistake of writing about topics they “think” their audience is looking for, without doing the right amount of research. The ideal topic needs to be not only relevant to your audience’s interests but also optimized to target the keywords and phrases they’re actually looking for.
The right keywords shouldn’t just be relevant to your customers and popular with the search engines; they also need “business potential”. In other words, they need to align with your sales and marketing goals, so you can convert your clients.
You can use free keyword research tools like Google Trends to find out what kinds of topics your customers might be asking about in your industry. There are also various valuable tools such as Ahrefs and SEMrush, which provide information on “search volume” and competition levels for each keyword you might want to target. Even Google Ads will give you an insight into top trending keywords and competitive terms.
When choosing the right topic to write about, it’s always worth taking a closer look at your competition and their content strategy. Tools like SEMRush, BuzzSumo, and Spyfu can give you a behind-the-scenes look at what your competitors are already writing about. This not only gives you access to some much-needed inspiration, but it can also give you an insight into which high-volume keywords aren’t being targeted by other brands.
Once you’ve chosen a relevant topic with competitive, high-volume keywords, ask yourself how you’re going to approach the subject. The best blogs should improve your topical authority and show your thought leadership. They should also appeal to the specific “search intent” of your target audience. There are four types of content to choose from, depending on the goals you want to achieve.
If you’re writing a blog about content creation, and you want to appeal to customers in search of guidance and information, you might want to write a “how-to” blog.
However, using your research, it’s worth checking whether “informative” content actually ranks for your chosen keyword. If your term tends to bring up sales-focused content for people with a “purchasing” intent, you may need to adjust your strategy.For instance, if you’re trying to appeal to customers further down the sales funnel and convince them to make a purchase from an affiliate partner or your own brand, you might use comparison articles or lists identifying the best solutions for a specific pain point.
Step 2: Analyze top-ranking articles and do keyword research
Check out what the top-performing content pieces have in common, so you know what kind of information Google and readers want your blogs to cover. You can simply search for the keywords you want to target or specific topics online to see what shows up at the top of the Google search results. Tools like BuzzSumo can also give you an insight into the top-ranking and trending content for certain search queries.
Once you’ve included all of the key topics from other posts in your outline, you can look for ways to make your content more valuable. Can you add data from studies or explore a specific “subtopic” in more detail?
Don’t just try to write something longer and more in-depth than your competition. Specifically, think about the kinds of questions your customers are asking that aren’t being answered by other brands. Your aim should be to deliver more value than any other ranking post.
Step 3: Choose an angle

Once you’ve analyzed the top-ranking posts, ask yourself what kind of angle you’re going to take with your content. Say you’re writing an article about the top social media channels. Are you just going to highlight the key demographics and features of each platform? Or are you going to add to the conversation with tips on how to use each channel too?
It’s also worth thinking about the specific perspective you want to convey with your “angle.” If you’re writing an article about content marketing tips, can you share your own unique experiences to make the article more specific to your voice?
Step 4: Outline the major sections and themes
With your angle in mind, ask yourself what the core “sections” of your post are going to be. You’ll need at least three core sections for each post to ensure it feels complete and comprehensive. For instance, most posts start with an introduction, include a “body” covering the majority of the information you want to share, and end with a conclusion.
The central part of your blog post, between the introduction and conclusion, should be broken down into clear segments. For instance, if you’re writing about “Stop words in SEO”, you might start with an introduction, then cover:
- What stop words are
- What common stop words look like
- How stop words affect SEO
- When users should leverage stop words
- When to avoid stop words
The major sections and themes of your blog post should strive to answer all of the questions your customers might have about your topic. Ask yourself what people are looking for when they click on your content and how you can avoid pushing them to search for information elsewhere.
Step 5: Determine the key takeaways for your readers
As you’re outlining the major themes and sections in your blog posts, ask yourself what the key takeaways are going to be from your article. In other words, what do you want your readers to gain from reading your content? In most cases, this will involve creating a series of questions you want your post to answer.
For example, if you’re writing a blog post about how to buy a blog, you might need to answer questions like:
- What does buying a blog involve?
- What does it cost to buy a blog?
- Is buying a blog a profitable strategy?
- How can you buy a blog online?
- How do you determine the value of a blog?
- What should you do before you buy a blog?
Think about what you want your customers to be able to do when they finish reading your post. If you’re writing a blog about how to buy a blog website, you’ll probably want them to know exactly how to purchase their own blog and make a profit from their acquisition.
Step 6: Insert relevant studies, data, and sources

Once you have the core components of your blog post laid out, you can start to think about the extra resources and information you can use to make your sections more compelling. For example, if you’re writing a post about how to define your target audience, you might add some links to additional blogs on how to create a user persona. This is a great way to build internal links for your blog.
You can also use links to studies, articles, and statistics to support your arguments. For instance, if you’re going to highlight the idea that personalizing an email marketing campaign will increase customer conversions, you should have stats to back that up.
Step 7: Revise and clean up your blog outline
Next, it’s time to go through your blog post outline and clean everything up. You’ve already done all of the hard work at this point. The main focus should simply be on removing any information, sections, or topics that aren’t going to deliver any real value.
Go through your outline and ask yourself whether you’re answering the correct questions and sharing the best possible information. Are there any core sections you’ve missed? Do you need to remove elements to make your blog post more concise?
If you find your outline is a little too big or overwhelming, you might discover your topic is too broad. This could mean you need to break your current post down into a series of smaller blog ideas.
Step 8: Create a catchy headline
While some people prefer to create the title for the blog post before they do anything else, others find it much easier to choose the title after they’ve outlined everything the blog is going to cover. Having a clear insight into the information you’re providing in your blog post before you choose a headline will inspire you to create a more relevant and meaningful title.
Remember, your blog title should give your audience an insight into what to expect from your post, without giving too much away. Try to engage your audience’s curiosity, while simultaneously demonstrating the value they’re getting from your post.
Our Free Blog Post Outline Template You Can Follow

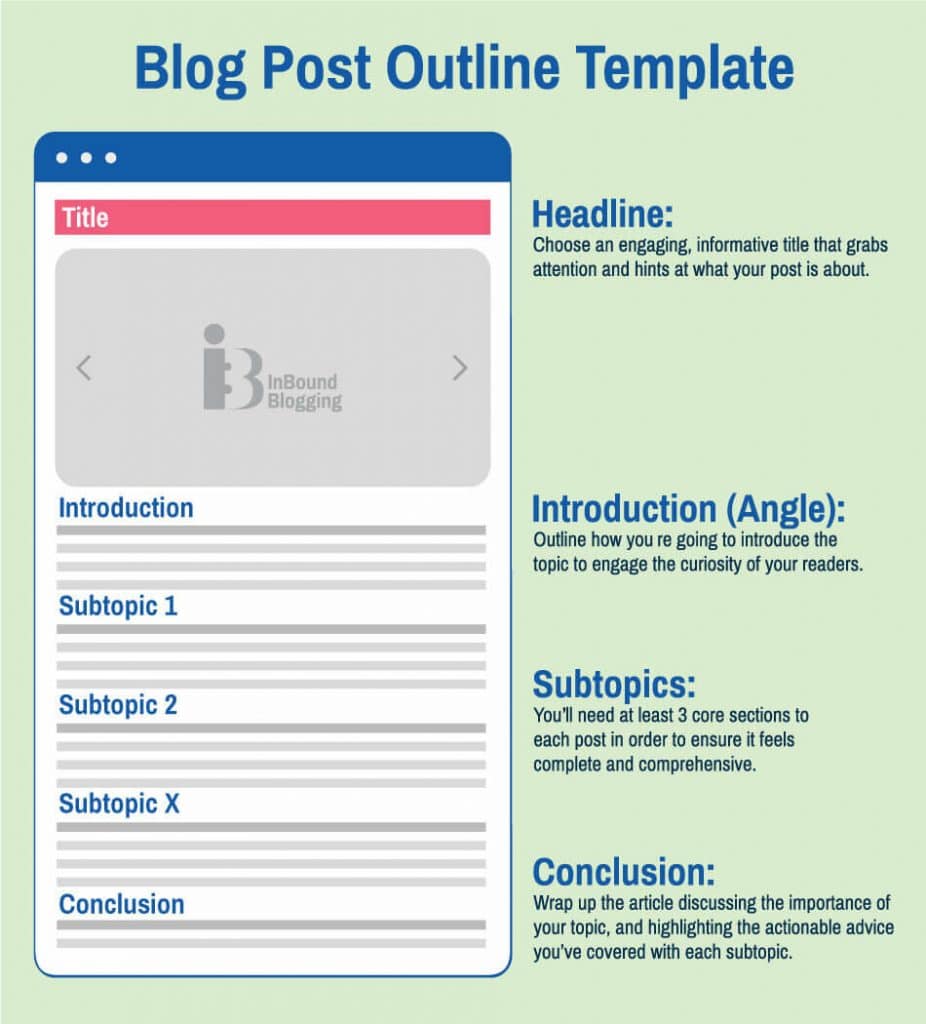
Now you know everything your article outline needs to include, you should be ready to start creating your very own, ultra-efficient outlines. However, if you’re still having trouble, here’s a blog post outline example you can steal:
• Headline: Choose an engaging, informative title, such as: “How to write a more engaging blog post” or “X Top tips on writing the most engaging blog post.”
• Goal: Your goal should highlight the key purpose of the blog. In this instance, the goal would be “Providing readers with actionable insights into what makes blog posts more engaging.”
• Introduction (Angle): Outline how you’re going to introduce the topic to engage the curiosity of your readers. You might highlight what engagement means in the blogging world, and why it’s so important to business owners and writers. Include relevant statistics and facts.
• Subtopic 1: Research your audience:
Introduce the first subtopic for your post. In this case, it might be “Research your audience”. Here, you’d tell your customers how to research their target audience, create user profiles and learn about their blog preferences. Speak about tone of voice, and how companies can add personality to blog posts.
• Subtopic 2: Ask your audience questions:
Follow up with another actionable section. This could be “Ask your audience questions”. Here, you’d describe engaging your audience by asking them questions and getting them involved. Share examples of great blogs that have done this in the past, and provide some example questions writers can use.
• Subtopic 3: Experiment with media:
Introduce another idea for boosting blog engagement levels. This could be “Experiment with media”. Tell the audience how they can use different kinds of media, like videos, images, graphs and infographics, to make the content they share in their blog posts more compelling. Share examples of companies who do this.
• Subtopic 4: Improve the flow:
Introduce and outline your next section. This could be “Improve the flow”. Provide tips on how to improve the flow of a piece of content. Discuss the use of short sentences, bullet points and headlines to make content more scannable. Discuss using powerful headlines in each topic and include examples.
• Subtopic 5: Monitor blog post results:
Introduce the final subtopic for your piece. This could be “Monitor blog post results”. Teach readers how to analyze the success of their blog posts and implement strategies based on what they learn. List the kind of metrics they should look at (Clicks, comments, shares), to track engagement. Include screenshots and pictures to help.
• Conclusion: Wrap up the article discussing the importance of engagement, and highlighting the actionable advice you’ve covered with each subtopic.
Explore my insightful article on top health blogs to discover valuable tips and insights on improving your well-being.
FAQ
What are the best blog post formats to use for my article outline?
The best blog post formats for outlining your content include listicles, how-to guides, product reviews, and personal stories. Each format offers a unique structure for your blog post.
How does outlining your blog post help with SEO?
Outlining your blog post allows you to incorporate relevant keywords and structure your content in a way that is easily understandable by search engines.
What are the key elements to include in my blog post outline?
The key elements to include in your blog post outline are the blog post title, introduction, main points or sections, supporting details, and a conclusion that summarizes the key takeaways of your blog post.
Can outlining your blog post help you avoid writer’s block?
Yes, outlining your blog post can help you avoid writer’s block by providing a roadmap for your content. When you have a solid outline, it becomes easier to begin writing and stay on track throughout the writing process.


