Playback speed:
Learning how to change your domain name on WordPress can be an important part of a rebranding journey. While you should never change your company’s name, domain name or your brand on a whim, there are various reasons why you may choose to alter your identity.
If you’re updating your brand, moving away from an outdated name, or merging with a new company, you may need a new domain name that’s consistent with your brand identity. However, updating your name without the right strategy can be problematic, as it could mean you lose all of the SEO (Search Engine Optimization) benefits you’ve generated over the years.
Today, we’re going to explore the steps involved in changing the domain name on your WordPress website the right way.
Why Change Domain Name?
Most businesses choose a domain name which matches their company, and they stick with that domain name for the lifetime of their organisation. However, there are exceptions to this rule. There are situations which might require you to alter your company name and your domain name. Some of the main reasons to consider changing your domain name include:
- Rebranding: Whether you’re merging with another company, shifting to new management, or trying to reach a different target audience, you may decide to update your brand. If you change your company name as part of your rebrand, you’ll need to change your domain name too, so it’s easy for customers to find you.
- Domain extension change: If you decide to expand from the standard .com domain into something more specific like .net, or .shop, you may need to change your entire domain name. This could be a valuable opportunity to make your site appear more unique.
- Merging multiple domains: If you’ve developed a new domain that’s gaining impact and authority, you may want to merge it with your existing domain. Merging domains can be a good way to combine SEO and backlink benefits from different websites.
- Creating a user-friendly URL: The simpler your domain name is, the more memorable it will be for your target audience. If your existing domain name or business name is complicated, you might consider changing it to a more straightforward company address.
Steps to Take Before Changing Your Domain Name
The good news for business leaders hoping to change their domain name, is the process is usually relatively straightforward. However, before you dive into this process, you’ll need to take a few preemptive steps. Before changing your domain name, make sure you:
1. Choose and Buy a New Domain Name
Before you start shifting all of your data onto a new domain name, you’ll actually need to own the domain name you want to use. Typically, this will involve searching for an available name with a domain registrar. Check that the domain is unique before you buy it, and ensure the option you choose is simple, straightforward and easy to remember.
If there’s a domain name you want that’s already in use, you may be able to find out who owns the domain and ask them whether it’s possible to purchase the name.
2. Backup Your Website
If you’ve spent months or years transforming your blog or website into a money-making opportunity, the last thing you want is to suddenly lose access to all of your website content and information. Make sure you have a backup of your website available before you start transferring content to your new domain name. Backing up your website is usually a quick and easy process.
There are plugins available for WordPress which can help you with your backup. Plus, some hosting providers also allow you to create backups of your site within your control panel.
3. Tell Your Audience
From the moment you’ve chosen and purchased your new domain name, you should be preparing your audience for the change. Get on social media and share information about your name change in advance. Post something about the domain change on your website, and send emails to existing customers. Reassure customers that they’ll still be able to access your content after the change.
How Can I Change My WordPress Domain Name?
Once you’ve taken the initial steps above, you’ll be able to start working on the technical process of changing your domain name. Most of the steps involved in this process are straightforward, but some will require you to make some tweaks to your PHP code. This is why it’s so important to make sure you have a backup of your current site available in case something goes wrong.
Backup your entire website (including your files and databases) using either your hosting provider’s cPanel solution, or a plugin like VaultPress or UpdraftPlus. You’ll also need to make sure you have access to a hosting dashboard or FTP client.
Your hosting dashboard will usually provide you with the tools you need to manage your domains, but FTP clients are available to upload your site backup too. Once you’re ready and you have your new domain name available, follow these steps:
1. Add the New Domain Name and Upload Your Backup
First, you’ll need to add your new domain name into your hosting plan. You can do this using the standard cPanel solution in your hosting environment. To begin, log into your cPanel account, and navigate to the “Domains” section. There should be an option to “Add” a domain.
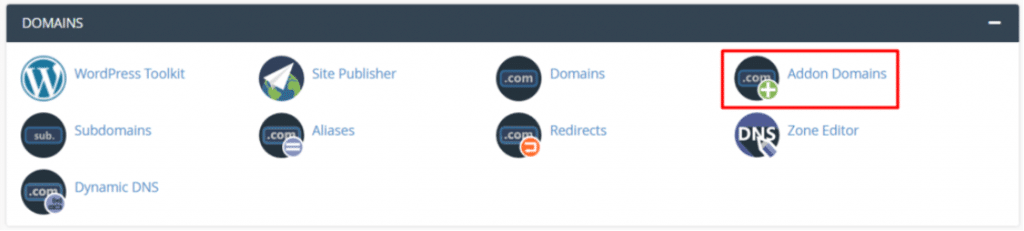
Next, fill in the information about your domain address, subdomain and document root.
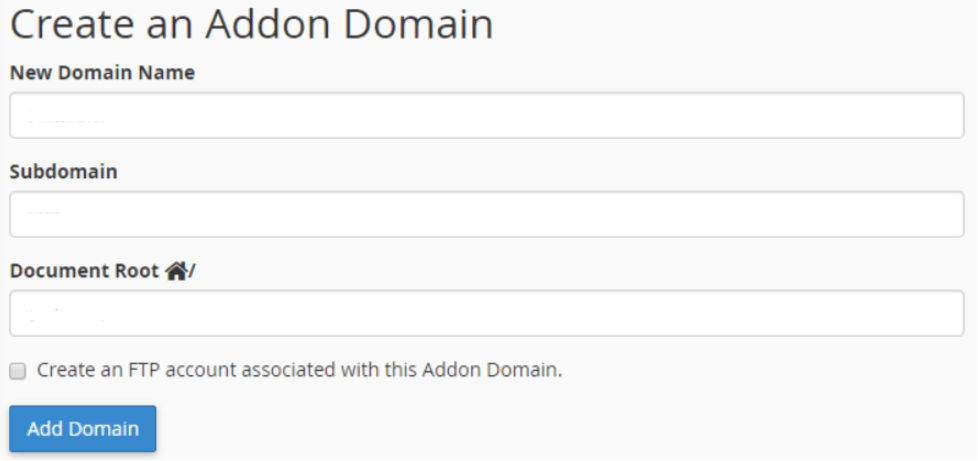
If you want to create an FTP account for your new addon domain, you’ll be able to check a box at the bottom of the form to do so. This will bring up additional settings for you, such as the option to add a new username and password. Once you’ve filled in all the information, click the “Add Domain” button.
Remember, you’ll need to add the correct DNS records to ensure your add-on domain works. There are online DNS checkers to help with this.
2. Copy the Core Files from Your Old Domain
Now you’ve got your new domain setup; it’s time to start transferring the core files from your old domain into your new site domain. If you already have a backup in place, download this file from your hosting dashboard. You can also copy your old domain folder to a new one.
The exact steps involved in moving your website content to a new domain may vary depending on the hosting provider you use. For instance, with Hostinger, you’ll need to access your hPanel dashboard, and go to the “File Manager” section. Click on the domain folder you want to move your content from in this section, and open your “public_html” directory.

Select all the files you want to move, and click the “Copy” or “Move” button to transfer everything to your new address. A box will appear allowing you to “change” the location of your files to your new domain. If you’re switching to a different host, you’ll need to download your backup and upload it via an FTP client or cPanel file manager.
3. Update the Site Address and URL
Now you’re ready to update the existing URL for your website and website address. This should provide a smoother experience to your visitors, and it will make it easier to maintain the SEO benefits for your site content. There are a few ways you can take this step. The easiest option is perhaps to use the WordPress Admin dashboard.
Go into your WordPress General Settings page, by clicking on “Dashboard” followed by “Settings” then “General”. Replace your current WordPress URL and Site Address in the available boxes with your new URL.
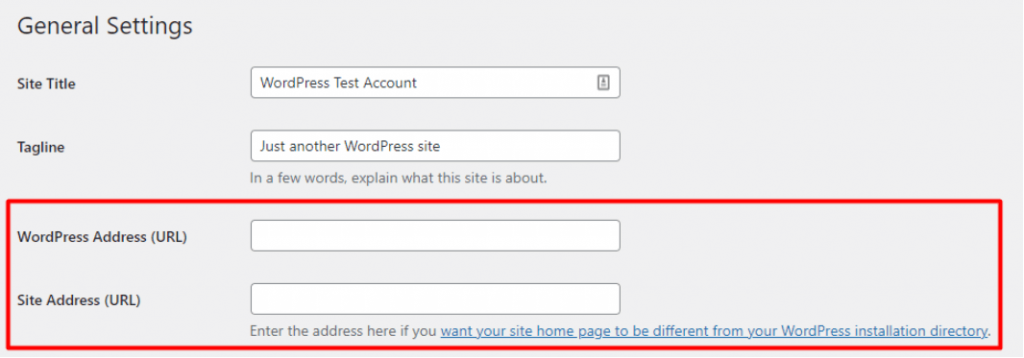
Both addresses should match unless you’re using a designated homepage for your WordPress site. Click “Save Changes” when you’re done.
An alternative option is to use the wp-config.php file. This file can be found in your WordPress site root directory, which you can usually access through your cPanel file manager, or an FTP environment. Click “edit” on the file, and insert your new site URL into the code. You may need some extra help with this if you’re not used to PHP code.
Another way to update your WordPress address URL is to adjust the database in the phpMyAdmin environment within your cPanel. You can do this by clicking on the “databases” section of your cPanel environment, and choosing the database where your WordPress files are located. Click on “Edit phpMyAdmin” and select the “Site URL” to edit.
4. Reset Your URL Structure
Once you’ve changed your URL and site address, you’ll need to update your URL structure. This will help to reduce the risk of your pages and posts showing the “404 error” when a visitor tries to access them, because the server can’t fetch the right resources.
There are a few ways to edit your URL structure. Most people prefer to reset their permalinks using the WordPress dashboard. To do this, visit the “Settings” page, followed by “Permalinks”.
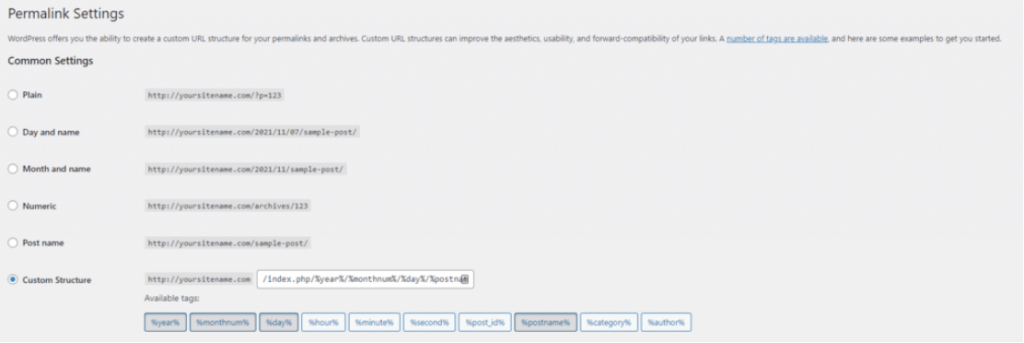
WordPress uses the “Plain” permalink structure by default, which doesn’t contain any information about your content. That’s not always ideal for SEO. You might consider switching to an alternative like “day and name” which shows the publishing date and name, or “custom structure”.
Usually, the best option is to use the post name structure for your URLs, as it’s still relatively short and straightforward for users. It also helps to include keywords in your URLs, so you’re more likely to benefit from an SEO standpoint.
Another way to edit your URL structure on WordPress is to use your database’s search and replace command. If you’re not comfortable with coding, you can do this a little more easily with a tool like the Better Search Replace plugin. Once you’ve installed the plugin, go to the “Tools” then “Better Search Replace” option within your WordPress admin dashboard.
In the “Search/Replace” section, add the text string you want to look for, and choose a replacement.
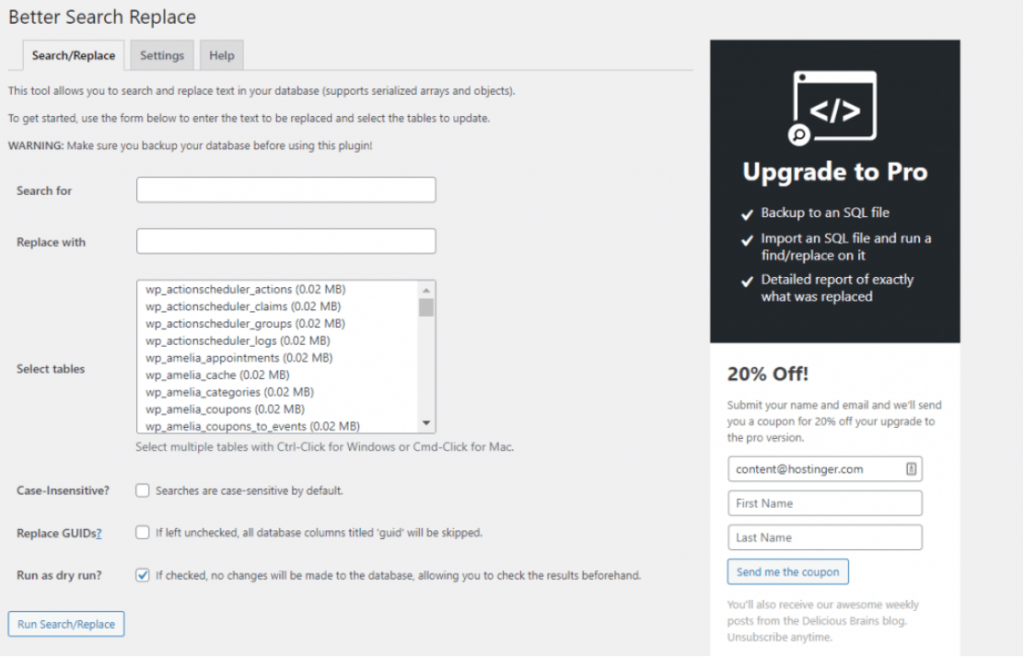
You can choose the database table you want to modify, and review the changes to your database before you apply them with the “Run as Dry Run” option. Finally, click “Run Search/Replace”.
5. Redirect Visitors from the Former Domain
Now, you’ll need to create a 301 permanent redirect from your old domain, sending users to your new one. This redirect is how you maintain your SEO standing from your existing website when switching over to a new domain name. The redirect will transfer your page ranking values, and keep you ranking in the same positions for your chosen keywords.
Although you’re going to be permanently redirecting traffic from your old domain to your new one, it’s often a good idea to keep your former domain active for a while. This ensures that anyone who isn’t aware you’ve changed your domain name will still be able to access your site. It also helps when it comes to notifying search engines about your redirection.
To create your 301 redirect, you’ll need to go into cPanel to access your .htaccess file. There are a few different ways to do this depending on what kind of hosting provider you’re using. For a hosting provider like Hostinger, you’ll need to go into hPanel then your File Manager.
Click on your old domain, then open the “File Manager” and find the .htcaccess file within the public_html directory, then click edit. You’ll need to replace your previous site name with your new domain name and the correct code.
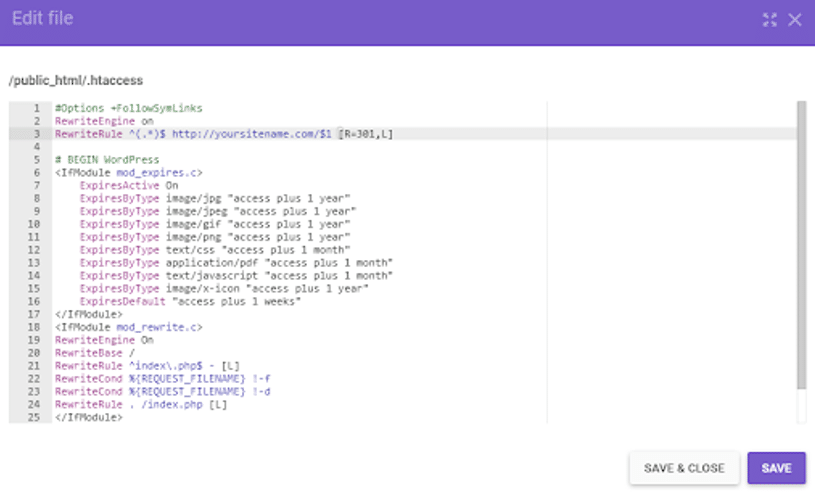
“Save” your work and close the file. You can also complete this step using an FTP client if you don’t know how to do it using your current hosting provider.
6. Notify Search Engines
Last, but not least, it’s worth letting the search engines know you’ve made a change to your domain name. Search engines like Google offer tools you can use to change your site address. This process involves filling out a simple form which notifies the search engine of the change, so they can start directing traffic more consistently to your new domain name.
You can learn more about how to use the Change of Address tool on Google here. There are various steps to follow in notifying search engines, but you will have completed some of them (like creating a 301 redirect) already.
Remember, you need to be a verified owner of both the old and new domain addresses in the Search Console in order to notify search engines of a change of domain address.
WordPress Change Domain Plugins
If you don’t have a lot of experience with PHP code and you’re anxious about changing your domain name yourself, you can make the process a lot easier by using some simple plugins. There are plugins for virtually every part of the process, from creating backups, to transforming your domain name. Here are some of the best plugin options to consider:
- Redirection: The Redirection plugin is a simple WordPress add-on which helps with creating your 301 redirects. This tool can also track 404 errors, which can help to reduce your risk of suffering SEO issues due to a problem with your pages not loading. You can even create redirects for your customers with this plugin based on login status, WordPress capabilities, browsers, referral links, cookies, and more.
- Duplicator: One of the highest-rated plugins for WordPress users looking to update their domain name or site factors, Duplicator helps with backups and migrations. With this tool, you can rapidly backup your entire site and move all of your files. This tool is particularly helpful if you’re planning on changing hosting providers when you change your domain. The system will download your entire site, including any themes and plugins into a .zip file.
- Backup Guard: Another excellent option for migrations and backups, Backup guard helps you backup your existing content, and restore functionality for your site when you move to another domain. There is a free version of this plugin available, but the premium version has more features. The premium plan also allows you to handle migrating your website from one domain to another without having to dive into too much code.
Changing Your WordPress Domain Name, the Right Way
Changing your WordPress domain name can seem like a complicated process, but it doesn’t have to be. If you find you need to change your domain name for any reason, whether it’s part of a rebrand, or you’re just trying to create a more user-friendly URL, then follow the steps above.
WordPress already offers a range of built-in settings to help you change your URL addresses, and there are countless plugins that can make the process of backing up your site, redirecting your visitors and migrating your data easier. If you’re concerned about any of the steps above, you can also find professionals online who can help with domain migrations.
You might also like:
")


Article by
Nikola Baldikov